
How To Live Stream By Yourself: A Beginner’s Guide

Live streaming is gaining popularity on the Internet.
It’s come a long way since its inception in the 1990s, growing from a few niche webcasts to a multibillion-dollar business.
If you are a content creator, gamer, or business owner and want to take full advantage of this incredibly personal format, this article is for you 😏
You may have participated in live streams on Youtube, Instagram, Periscope, Clubhouse, or TikTok and know how effective these can be in growing the audience.
We understand that the prospect of launching your own live stream might be intimidating. That’s why we’ve put together this beginner’s guide to live stream.
If you have no prior expertise or experience but wish to try live streaming, these 5 tips will help you:
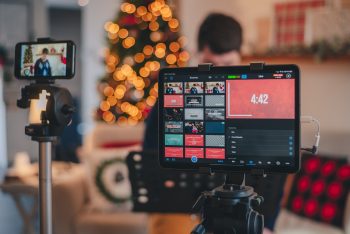
1. Get streaming setup
There are only 2 main things you need to go live as a beginner – a camera and a microphone.
If necessary, start only with a webcam on your laptop, or switch to a more effective webcam without spending too much money upfront.
While your camera does not need to be of the highest quality, you will need a good microphone.
If you’re sitting at your desk, you might want to acquire a standing/shotgun mic, but if you’re getting up and moving about a lot, you might want to get a lavalier microphone.
A basic stream may have only one video and audio source, but a more complicated stream may contain two or more audio and video sources.
Always be aware of the background music in your live broadcast because copyrighted content might be monitored and flagged by online video services. You may be charged with a copyright violation or perhaps have your streaming privileges revoked.
2. Choose a video encoder
The video stream is “translated” for the Internet via an encoder. An encoder is a program that compresses and transforms an audio-video stream into a digital, web-friendly form. Since most video sources aren’t designed for live streaming, you’ll need an encoder. Video cameras are designed to capture huge, bulky video files, not to broadcast in real-time.
Essentially, there are 3 sorts of encoding devices available today: a mobile phone/tablet, a PC with streaming software installed, or a specific hardware encoder.
While a mobile phone may serve as an all-in-one video source and encoder, its live production capabilities are severely constrained. A good stream is one that maintains a delicate balance between frame rate, bitrate, and output resolution. The amount of data you can send is mostly determined by the sort of encoder you are using and your Internet access.
3. Assure stable Internet connection
You’ll need a stable Internet connection if you’re uploading video and audio to broadcast in real-time, or if you’re streaming while gaming.
Also, many streaming software, which can be found on www.learningrevolution.net allow you to select multiple channels to broadcast to at the same time.
Obtaining a stable network connection is sometimes the most difficult aspect of live streaming. A hardwired, dedicated Ethernet line proved to be the most dependable connection. Of course, you may use Wi-Fi or cellular (4G/LTE) Internet to go live, but these sorts of signals are prone to fluctuation.
We cannot emphasize enough the importance of doing a speed test beforehand. To accommodate for any network variations, we recommend having 1.5x your stream’s bandwidth available at all times.
4. Choose a streaming platform
The website, service, or application where your live video is made available to others is known as a streaming destination. Content delivery networks, or CDNs, are the most frequent names for these destinations. Youtube, Facebook Live, Twitch, and other popular free CDNs are just a few examples.
Each CDN, of course, caters to a certain audience. You may start picking a suitable CDN as soon as you figure out what you’re live streaming and who your primary audience is. Twitch, for example, is mostly used for gaming. Twitch is free to use at first, with more levels available if needed. Youtube may be used for a variety of purposes, including personal, lifestyle, and show videos, whereas Facebook can be used to engage with your community, share breaking news, and promote your company.
5. Prepare yourself
You may have heard some widespread illusions about live streaming that are preventing you from getting started: it’s too expensive, no one will care what you have to say, or you’ll have to give up your privacy.
These live streaming misconceptions are false and should not deter you from participating. For most individuals, speaking into a camera without a real audience behind you — and keeping entertaining and interested while doing so — is a learned ability. If being in front of the camera makes you nervous, there are several resources available to help you gain confidence.
Final advice
Live streaming is a big topic, and each example of broadcasting is unique. This article was supposed to be a very broad overview of how to go live. However, we hope you learned some foundations of going live and how to get started with live streaming. Understanding these basics and putting them into practice will definitely improve your live streaming.